IMPORTANT: Excel Sheets and Excel Named Ranges must have 500 or fewer rows and 50 or fewer columns. If you include an argument for an Excel Sheet or Excel Named Range that exceeds the maximum limit, you will receive an error message when attempting to process.
-
Navigate to the Object Lookup dialog box in OneStream. This dialog box provides all the syntax needed to insert content into an extensible document. This icon can be found on the following pages under the Application tab:
-
Form Templates
-
Books
-
Cube Views
-
Workspaces
-
Data Management

-
-
In the dialog box, select Extensible Document Settings. Expand Insert Content Using Document Variables and then expand Excel Named Range. Select the line of syntax, and click the Copy to Clipboard button to copy the first string.
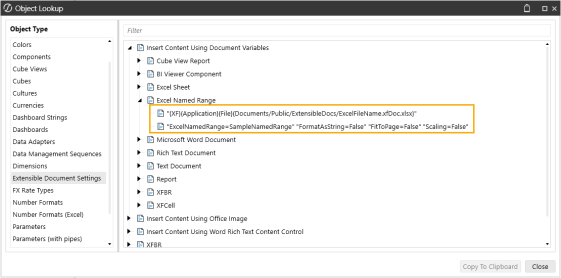
The default value for the FormatAsString parameter is False. When FormatAsString = True, the named range will display as a string instead of a table. If the named range has multiple cells or rows, the cell values will be appended together and each row will display on a new line. If FormatAsString is removed from the document variable, the named range will display as a table as if FormatAsString=False.
The default value for FitToPage parameter is False. When FitToPage=True, the named range is resized in the document to fit to page. The default value for Scaling parameter is False. When FitToPage=True, the scaling parameter can be set to True to further resize the named range. If FitToPage or Scaling are removed from the document, the value will display as False.

-
In Microsoft Word, begin with a new or existing document.
-
To insert your string, go to Insert > Quick Parts > Field.

-
A Field dialog box displays. Under Field Names, select DocVariable. In the New name field, paste the string. The string "{XF}{Application}{File}{Documents/Public/ExtensibleDocs/ExcelFileName.xfDoc.xlsx}" displays in the field.
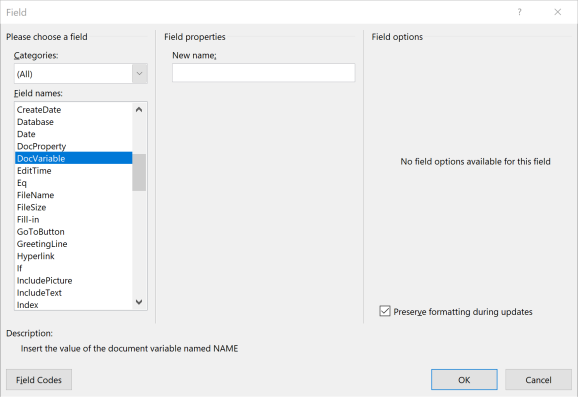
Optional: After the first string in the DocVariable field, you can paste the "ExcelSheet=Sheet1" or "ExcelNamedRange=SampleNamedRange" arguments. You must separate the arguments by a space. See Extensible Document Settings for more examples on these different item types.
TIP: Under Field Options, ensure Preserve formatting during updates is selected. See Preserve formatting during updates for more information.
-
Update the values to reflect the folder structure and Excel path. Then in the Field dialog, click the OK button. The final string will display in the Microsoft Word document: {DOCVARIABLE "{XF}{Application}{File}{Documents/Public/Extensible Documents/Excel4.xfDoc.xlsx}"ExcelSheet=Sheet2"}
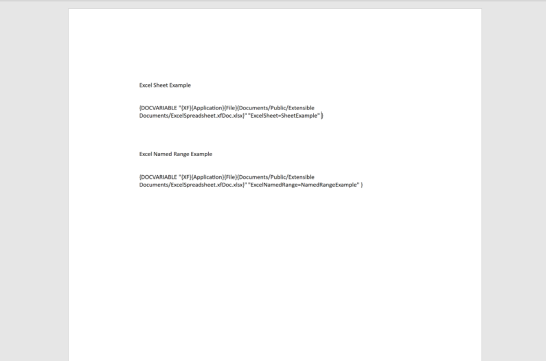
IMPORTANT: You must manually update and remove extra " (quotation mark) and \ (backslash) symbols, or the Document Variable will not process correctly.
-
Place your cursor on the page, and press the Alt+F9 keys. This allows for the selected value to be shown or hidden on the page.
IMPORTANT: If the expected content does not display after clicking the OK button in the Field dialog box, press the Alt+F9 or Alt+Fn+F9 keys.
TIP: If pressing the Alt+F9 keys does not work, press Alt+Fn+F9 simultaneously instead.
-
Select File and Save As. Select a file name and add .xfdoc extension to the name. The file name is appended with ".xfdoc.docx".
-
Click Save to save the file and ensure it is saved in a familiar folder. For example, Documents).
-
Navigate back to OneStream, and open File Explorer. Under the folder of choice, select and upload the file in File Explorer.
-
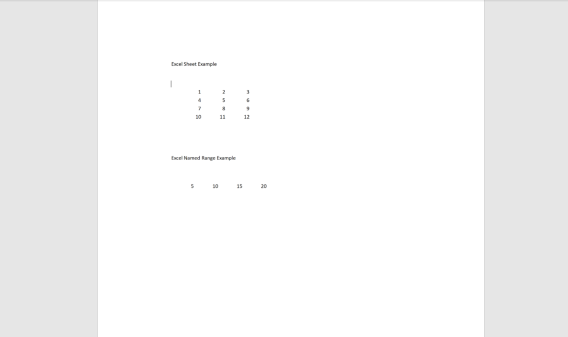
Right-click on the file and select "Process and Open". You may need to enter or select a parameter and then click OK.
The Microsoft Word document displays the data being requested by the Excel Sheet or Excel Named Range.
TIP: If the Document Variable content is shaded after processing and opening in Microsoft Word, update your settings in File > Options > Advanced > Field shading: Never.


